This ensures that your RP2040 PCB is done according to specifications. The hostel is organized, clean and gives value for money. Pico is not a Linux single board computer, rather it is a microcontroller like Arduino.

This added capacitance, of course, changes the overall load capacitance required by the RP2040 for its oscillator. Go to Files > Examples > Basics > Blink and click on Upload, this will load the code to the Pico board. How to program Pico using C/C++ and MicroPython, a. Situated in Milan Centre, this hostel is near Palazzo Reale, the University of Milan and Giuseppe Verdi Conservatory. Your email address will not be published. 4. We all love our iPads, but are they bad for the environment? They use variable voltages to connect to devices like a potentiometers, joystick or a LDR), - 2 SPI, 2 I2C, 2 UART, 3 12-bit ADC, 16 controllable PWM channels, - 8 Programmable I/O (PIO) state machines for custom peripheral support that can offload many kinds of timing-critical processes from the CPU, - 1 Contains 1 USB 1.1 controller and PHY, with host and device support, - Accelerated integer and floating-point libraries on-chip, - Works with Windows, Mac, Linux machines and Raspberry Pi Computers, - Provides drag-and-drop programming using mass storage over USB. The answer is that I wanted the experience of building my own board, and I wanted a board on which I could easily try out different components, such as different flash chips. Tiny I2C Routines for all AVR Microcontrollers, Previous: Or order boards from OSH Park here: Minimal RP2040 Board. Couple of months ago, I bought a "Raspberry Pi Pico" to get some hands-on experience of it and to create some amazing projects using it. To be safe, just stick with Winbonds W25Q series. Unlike Bed & Breakfasts or hotels, our services are way more affordable. Alternatively, you can plug a USB breakout board directly into the prototyping board, as the pins are designed to line up. The USB connections are in the same order as on a USB breakout board, so you can plug one onto a prototyping board alongside the appropriate pins. As for PCB design, the RP2040 QSPI pins must be wired as close to the external QSPI flash IC as possible to avoid crosstalk. However, being able to program a Pico just like an Arduino would help us to integrate the Pico into the Arduino ecosystem.

Another resistor (1k) is in series with the QSPI_SS and USB_BOOT. For instructions on how to install it see: https://github.com/earlephilhower/arduino-pico.
Afraid of soldering the tiny QFN package and other SMD components yourself? Open the Lesson-16 Potentiometer example by Thonny, you can adjust the potentiometer and check if the voltage printed to the Sheel window are changing as well. email = "david" + String.fromCharCode(64) + "technoblogy.com" Here are some tips on what to bring with you on, Are you concerned about the environmental impact of your electronics? All the source code for the Raspberry Pi Pico SDK, examples and other libraries can be found on GitHub. PCB design is critical to an external oscillator, like in other microcontrollers. If you want to support me subscribe to my YouTube Channel: ETH: 0x939aa4e13ecb4b46663c8017986abc0d204cde60, BAT: 0x939aa4e13ecb4b46663c8017986abc0d204cde60, https://diyfactory007.blogspot.com/2022/01/getting-started-with-raspberry-pi-pico.html, https://datasheets.raspberrypi.com/rp2040/rp2040-datasheet.pdf, https://datasheets.raspberrypi.com/rp2040/hardware-design-with-rp2040.pdf, https://datasheets.raspberrypi.com/pico/pico-datasheet.pdf, https://datasheets.raspberrypi.com/pico/getting-started-with-pico.pdf, https://micropython.org/download/rp2-pico/rp2-pico-latest.uf2, https://circuitpython.org/board/raspberry_pi_pico/. Whether you want a movie night, party or barbecue, weve got you covered. Raspberry Pi Pico is absolutely different from all other Raspberry Pi models. * Raspberry Pi Pico is cheap, very small, and easy to use microcontroller, * Pico is a dual core device coupled to a high-performance bus matrix, which means its both cores can give you the full performance concurrently, * Pico can be programmed using C/C++ and MicroPython, * Pico can be programmed using Arduino IDE, * Pico has 26 multi-function 3.3V GPIO pins (23 Digital + 3 Analogue), * Pico comes with 8 x Programmable IO (PIO) and 2 x Analog Inputs, * Pico boots quickly and doesnt require a safe shutdown, * Pico completely lacks WiFi and Bluetooth without any add-ons, * It lacks the GPIO markings on the top side of the board, * The board comes unsoldered so you will have to solder the header pins or surface mount it to use it in your project. We target visitors whore looking for short-term or long-term stay at affordable costs. Weve hosted hundreds of thousands of guests from around the world over the years.

In summary, for a basic PCB design featuring the RP2040 microcontroller: With these PCB design tips in mind, make sure to choose a capablePCB manufacturer.

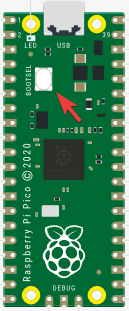
Connect the micro USB cable to the Pico and then press and hold the "BOOTSEL" button before plugging the USB cable into the computer. Finally I soldered the remaining components on the top of the board, again using the hot air gun. If you have a Windows, Apple, Linux or even a Raspberry Pi, then you are already well in your way to program the small, cute, and gorgeous Raspberry Pi Pico in your next project. Open the Lesson-21 LCD1602 I2C example by Thonny, you need to first save the RGB1602.py to Pico and then run the Choose_Color.py file. Python and C/C++ are both great for programming Picos. Advantages and Disadvantages of this board. Upload or insert images from URL. When picking them up with the tweezers it's easy to accidentally flick them across the room, and they also tend to blow away if you get the hot air gun too close!
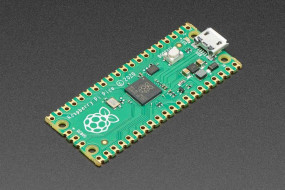
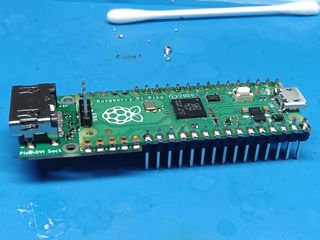
It is a custom "System on Chip" (SoC) developed by the Raspberry Pi team in UK which features a dual core Arm Cortex M0+ processor running at 133 MHz, 264KB of SRAM and 2MB of flash memory for storing files on it. Connect the Pico to Raspberry Pi or PC. However I've drawn my version of the circuit slightly differently, with each decoupling capacitor next to the pin it is decoupling to make it clearer. As this was the first time I'd worked with 0402 components I found it a bit of a challenge. The pin-labels are on the bottom side of the board.

Release BOOTSEL once the drive RPI-RP2 appears on your computer. Connect the micro USB cable to the Pico and then press and hold the "BOOTSEL" button before plugging the USB cable into the computer. However, in 2021 Raspberry Pi Foundation stepped a few steps forward and launched the Raspberry Pi Pico giving a head-to-head challenge to Arduino and all other board based microcontrollers. My procedure for assembling the board is described in the following sections.

Release BOOTSEL once the drive RPI-RP2 appears on your computer. Hostel Lombardia offers accommodation for guests and students living in Lombardy.

I recommend ordering a few spares in case this happens. Enter "blink.py" as the file name. You could connect push buttons between GND and the RST and BO pins to make this easier. * Before Raspberry Pi Pico, Raspberry Pi has always been know for their single board computers. Click the "Run" button to execute the code.

Check the DVDD voltage, on pin 45 of the RP2040, which should be 1.1V. The board grew from a simple breakout board to something similar to the Raspberry Pi Pico, so you might wonder why I bothered to design it rather than just buy a Pico. Its a question, How to choose where to go on a holiday Choosing where to go on a holiday is one of the most challenging decisions. Longer traces will affect the signal.
A Python Shell called "REPL" (Read, Eval, Print, Loop) will popup to show that the Pico is connected and working. That is, when the RP2040 is pumping up its computational powers, the LDO may swing from its intended output. Before connecting up the board I recommend doing the following checks: If this all seems OK you could go ahead and try uploading and running a sample program. Open the Lesson-14 Burglar Alarm LED Buzzer examples by Thonny.The LED lights on if an object is moving around the Passive infrared sensor and the buzzer will indicate. Raspberry Pi Pico is a low-cost microcontroller. We also offer discounts and other great promotions from time to time. Connect the Pico to Raspberry Pi or PC.
This is smaller than I usually use so I was a bit apprehensive about working with them, but it wasn't too difficult. Nevertheless, THERE IS a difference and this article will outline all the things you need to consider prior to submitting your PCB layout for mass production.
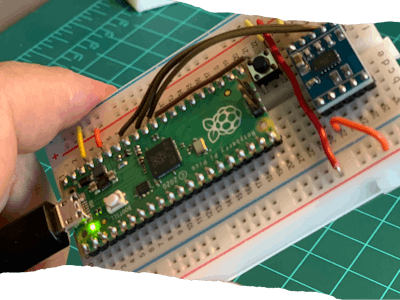
None of the component values are particularly critical, and most of them could be 10%, apart from the crystal capacitors which should probably be 5%. PCBgogo also maintains good communication with its customers for special requests. The RP2040 datasheet suggests that DVDD can be wired directly to VREG_VOUT, which also produces 1.1 V. VREG_VOUT is an output from an internal LDO experience has thought us that an internal LDOs efficiency comes and goes with a cores workload. Nevertheless, the Raspberry Pi foundation recommends using one because it is much more stable than the RP2040s internal oscillator. This is a great way to spend less on accommodation and stick to your budget. Prepare to use as many SMD components as possible, with RP2040 itself being a tiny QFN, Be careful in designing the layout for the QSPI flash chip: make signal traces shorter than 20 mm with a width of 0.15 mm, Keep external crystal and its traces far away from other high-speed traces like the QSPI; also keep the load capacitors close to the crystal, USB traces must be 0.8 mm in width and 0.15 mm in spacing, For the headers, keep one side all connected to the ground to minimize electromagnetic interference, With these PCB design tips in mind, make sure to choose a capable. Connect the boards as in the picture below. It was designed in Cambridge, UK, by the team behind the Raspberry Pi boards,and is fabricated by TSMC using their 40nm process [1]. Were a smart option for all visitors looking for budget accommodation in Lombardy. Since, its a microcontroller it doesn't come with all the overheads that a computer brings and hence consumes much less current. They are available from Adafruit [11] or AliExpress. Although it is recommended to go with a QSPI flash that is comparable to Winbonds W25Q128JVS. Lombardy is home to several hostels and other types of accommodation. I designed a PCB in Eagle and sent it to PCBWay for production: My aim was to make the board as small as possible, and it ended up slightly smaller than the Raspberry Pi Pico board. Clear editor. Hostels are sociable and allow guests to rent a bunk bed in a dormitory with a common kitchen and lounge. Electronics-lab.com 2022, WORK IS LICENCED UNDER CC BY SA 4.0. Unlike many other processors the RP2040 doesn't include flash on chip, but includes a QSPI flash interface to make it easy to interface an external flash chip.

Our hostel atmosphere is friendly and inviting. Compared to that, the response Pico received after its initial launch in 2021 is absolutely mind-blowing. However, prices usually go slightly higher during the holiday season such as Christmas and the New Years Eve. The hardest component to solder is the RP2040, so I started with this. We also organize various fun activities for our guests.

I then heated up the chip with the hot air gun until I could see the solder glistening along all four edges of the package. Thonny comes with built-in Python 3.7, so just one simple installer is what you need to learn programming.
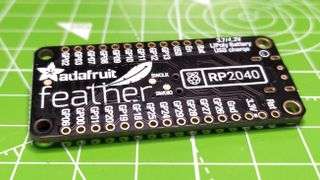
Other hostels in Lombardy include Combo Milano, Milano Ostello, Hostel Colours, Central Hostel BG, Ostello del Castello Tirano, Milan Hotel, and Ostello La Goliarda. First download the latest ARM version of uLisp from the. This ensures that visitors can easily communicate with our staff to get their needs met. The RP2040 seems to have a lot going for it: it has a good set of features, the documentation is excellent [2], there are many useful example programs [3], bare chips are under 1/$1, and unlike many processors at the moment they actually seem to be available [4]. The website's link is in the description below. I bet, there must be a lot of project ideas going in your mind, so get your supplies and start coding. Furthermore, each staff speaks at least 3 or 4 languages, including English, Italian and French. Raspberry Pi Pico Get Started with MicroPython on Raspberry Pi Pico, Demo codes for Raspberry-Pi-Pico-Basic-Kit, Demo codes for Raspberry Pi Pico Sensor Kit, https://www.waveshare.com/w/index.php?title=RP2040-Zero&oldid=30976, RP2040 microcontroller chip designed by Raspberry Pi in the United Kingdom, Dual-core Arm Cortex M0+ processor, flexible clock running up to 133 MHz, 264KB of SRAM, and 2MB of on-board Flash memory, USB-C connector, keeps it up to date, easier to use, The castellated module allows soldering direct to carrier boards, Drag-and-drop programming using mass storage over USB, 29 multi-function GPIO pins (20 via edge pinout, others via solder points), 2 SPI, 2 I2C, 2 UART, 4 12-bit ADC, 16 controllable PWM channels, Accelerated floating-point libraries on-chip, 8 Programmable I/O (PIO) state machines for custom peripheral support, Please set the Thonny development environment to be RaspberryPi when setting. From the interpreter dropdown list select "MicroPython (Raspberry Pi Pico)". On the sample PCB layout by the Raspberry Pi foundation, the outer rows are always ground pins while the inner pins are the IOs: This scheme is not required, but I personally found it convenient when designing the PCB. The Dos And Donts Of Packing For A Hotel Stay. services with them sourcing all the needed components! Connect the Pico to Raspberry Pi or PC. This is required for both W25Q and non-W25Q flash chips. Your previous content has been restored. It can be used to control other electronic modules and sensors same as any other microcontroller.
But in terms of PCB layout, here are the areas where the RP2040 stands out: We have been designing boards for microcontroller systems and its common to have two levels of voltage supplies. There are three entries for each board; for example: Generic RP2040Generic RP2040(Picoprobe)Generic RP2040(pico-debug). I soon realised that I could reduce the number of header pins by interconnecting the supply lines, and including the decoupling capacitors on the board.
The RP2040 is only available in one package size, QFN56, and I think it's safe to say that this makes the board impossible to solder with a conventional soldering iron. Pico is not a rival of Raspberry Pi Zero, it actually can work in conjunction with the regular Pi's. But the RP2040 is unique in the sense that it requires 3.3V for peripherals but only 1.1V for its digital core (DVDD). Installation of MicroPython on Pico requires a "UF2" file to be copied onto it. * Pico can be used alone or in combination with Arduino for Automation and AI purposes. They are all in sequence, apart from 28 and 29 which are swapped as that's the only way I could manage the PCB layout.
I hope it helps you. Open the WS2812_RGB_LED.py file of Lesson-25 WS2812 example by Thonny, the LEDs light in Blue, Red, Green, and White. Connect the Pico to Raspberry Pi or PC. Politecnico di Milano and Istituto Besta lie within the proximity of this hostel at Citta Studi. Chiesa di San, San Lanfranco, Chiesa di Santa Maria del Carmine, and Pietro in Ciel dOro are close to this hostel in Pavia. Hence, an external 1.1V source is much more recommended. Printing to a Serial LED Display, Copyright 2014-2020 2. The next step was to solder the 0402 components on the bottom of the PCB: The bottom of the Minimal RP2040 Board, showing the decoupling capacitors and other components. I'd been thinking about designing a project based on the Raspberry Pi RP2040, and to get more familiar with it I decided to try building a minimal RP2040-based computer on a prototyping board. If this is not possible, use a microstrip impedance calculator to achieve the correct dimensions for an impedance of 90 ohms. To write code and save files to Pico we are going to use the "Thonny Python IDE". Open the Lesson-9 Traffic-Light-System example by Thonny, run the codes and test the traffic light, the buzzer sounds when you press the button. PCBgogohas no problems building PCBs with trace width as low as 0.07 mm or thickness of as low as 0.4 mm. has no problems building PCBs with trace width as low as 0.07 mm or thickness of as low as 0.4 mm. The one biggest disadvantage of the Raspberry Pi Pico is that there is no WiFi or Bluetooth on it. Programming Raspberry Pi Pico using Arduino IDE. Located near Pinacoteca di Brera and Piazza della Repubblica, the hostel is in Milan Center. Most of the passive components are 0402 size. The trace length must not exceed 20 mm while a trace width of 0.15 mm should be ok. For USB traces, a trace width of 0.8 mm with a spacing of 0.15 mm for a 1 mm board is recommended. At Raspberry Pi we have a very community-based attitude to help. Connect the Pico to Raspberry Pi or PC. Programming Raspberry Pi Pico using Tonny Python IDE. You can leave all the other options at their defaults. 3. Connect the Pico to Raspberry Pi or PC. 1. For easy use, we recommend you use the Thonny tool. For the other components I avoided the smallest package sizes, and chose the versions that are most widely available. Its budget-friendly. January 10 in Electronic Resources. [CDATA[ Then, in Thonny go to Tools > Options and click on the "Interpreter" tab. * Both units are made for automating applications that dont involve human intervention. Then increase the voltage to 5V and check that the regulated output on the 3.3V header pin is correct. Ashish Adhikari, You can find our forums at the following link.
Its accessible through the Montenapoleone Fashion District. I then used a pair of tweezers[9] to pick up the RP2040 chip and gently drop it in position. Programming Raspberry Pi Pico using "Tonny Python IDE", 4. The LCD will change color every 5s. Choose "MicroPython device". Thanks again for checking my post. It has a Dual-Core ARM Cortex M0+ processor. Connect the boards as in the picture below. Connect the boards as in the picture below. And, what are you waiting for??? Open the Lesson-5 External LED example with Thonny. Youll also have access to a fully-equipped kitchen where you can prepare meals for yourself. All the main components are on the top of the board, apart from the decoupling components which are on the bottom of the board to make the PCB layout simpler. One option is to make a USB cable using a length of four-core ribbon cable and a USB DIY Connector Shell [10], with a five-pin header at the other end to plug into the prototyping board. - Microcontroller: RP2040 designed by Raspberry Pi in the UK, - Processor: Dual-Core Arm Cortex-M0+ processor, flexible clock running up to 133 MHz, - Memory: 264KB of on-chip internal SRAM and can support up to 16MB of off-chip Flash, 2MB on-board QSPI Flash (Adafruit's Feather RP2040, features 16MB of storage), - GPIO: It has 40 GPIO through-hole pins also with edge castellation, - 26 multi-function 3.3V GPIO pins, which includes 3 analogue inputs (The Analog inputs is something other Raspberry Pi's lack. The farther the load capacitors, the higher the parasitic capacitance introduced. To start, let go to Tools > Boards > Boards Manager and search for "Pico", select "Arduino Mbed OS RP2040 Boards" and hit the install button. For the main Raspberry Pi website, see here. Depending on the season and your duration of stay, you may be eligible for up to a 10% discount. The numbers correspond to the pin number in the I/O port, which is the same as the Arduino pin number. I therefore started designing my own breakout board in Eagle.

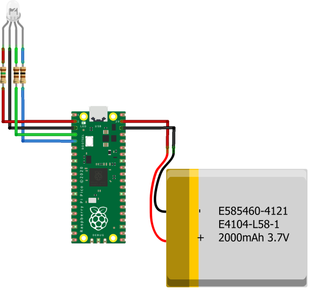
It can be powered either via the micro USB port, or via the VSYS GPIO pin by providing voltage between the range of 1.8V to 5.5V. You should then see the LED giving one-second flashes.

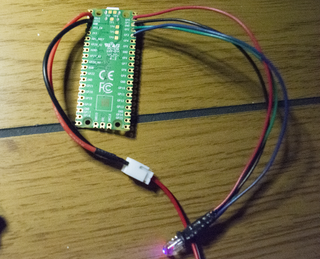
Display as a link instead, Decoupling capacitors are also important components in RP2040s power supply. To check that the board is working try running some example programs, such as Blink.
Online dating has become the new ordinary. By Here is the top view of the pinouts on the Raspberry Pi Pico. Now lets have a look at the Pros and Cons of this microcontroller board. Surely we can add wireless connectivity via external components, however that would require a little bit more knowledge and experience to get it working. Using the Raspberry Pi Pico is convenient, but as you level up your project, youll find that it is much better to create your own PCB that satisfies your design requirements. I checked it with the hand lens and gave it a few taps with the tweezers to centre it up perfectly. 2. Our staff are also friendly and enjoy helping visitors to have a comfortable stay with us. They include luggage storage, free Wi-Fi internet access, free coffee or tea, room service, and lockers. Click in the main editor pane of Thonny and enter the following code to toggle the onboard LED. 3. We run a very popular and busy forum where you can ask questions about any aspect of the Raspberry Pi ecosystem, including the Raspberry Pi Pico. We dont just welcome guests with a drink, but the longer you stay with us the more consistent the discount youre eligible to receive. More and more visitors and international students prefer to stay at hostels than hotels. Connect the boards as in the picture below. Run the example, and you will find that the red LED is flahsing. * GPIO pins are 3.3V, which could be seen as a disadvantage, however devises designed for 5V can still be used with 3V via a voltage divider or a logic level converter.

* Pico module supports MicroPython and C/C++, while Arduino codes are written in C/C++ using Arduino.IDE. Ground planes are always a good idea; create one that readily connects the ground pin of the QSPI flash.
The parts in the following parts list are just suggestions.

Note: If you are running "Raspberry Pi OS" then Thonny is already installed on it, but may need to update it to the latest version. Or order boards from PCBWay here: Minimal RP2040 Board. You can use any compatible flash chip up to 16Mbytes; see the hardware design datasheet for information about choosing a different flash chip. We also pride in our friendly staff with proper training and qualifications to serve our diverse pool of guests. Connect the Raspberry Pi Pico to your computer.
You may also meet your travel partner at our hostel.
Leave a comment
You can program your Pico using MicroPython by connecting it to a computer via USB and then dragging and dropping files to it. Next: However, it lacks kitchen equipment. A hostel is a type of lodging that offers low-cost shared accommodation to guests. Hostel Lombardia offers affordable accommodation to its visitors. I also put a small blob of solder paste in the centre of the pad; this is essential as it's the ground connection.

14th April 2022: Added the 1.1V supply to the circuit diagram. Roland Pelayo
You cannot paste images directly. That's it, you are now running MicroPython on your Pico. PCBgogo also offers precise component placement and. 2. Apply power to the 5V input, initially starting it at 3.3V, and monitor the current consumption, which should be around 10mA. Please follow the guides of Raspberry Pi to install and set up Pico for the Pico.
Sitemap 24