 This image may not be used by other entities without the express written consent of wikiHow, Inc.
\n<\/p>
\n<\/p><\/div>"}, {"smallUrl":"https:\/\/www.wikihow.com\/images\/thumb\/1\/1d\/Make-an-Elastic-Headband-Step-7.jpeg\/v4-460px-Make-an-Elastic-Headband-Step-7.jpeg","bigUrl":"\/images\/thumb\/1\/1d\/Make-an-Elastic-Headband-Step-7.jpeg\/aid263094-v4-728px-Make-an-Elastic-Headband-Step-7.jpeg","smallWidth":460,"smallHeight":345,"bigWidth":728,"bigHeight":546,"licensing":"
\u00a9 2022 wikiHow, Inc. All rights reserved. You can unsubscribe at any time. Align the turned-under edges of the fabric tube, so they are even. Your email address will not be published. 4. So its fun to add a cute accessory to make a messy topknot or ponytail look more intentional and a great way to show off your cute fabric! You can find an anti fray solution at a sewing store or in the glue section of a craft store. I used a medium weight cotton, but any cotton will do. This image may not be used by other entities without the express written consent of wikiHow, Inc.
\n<\/p>
\n<\/p><\/div>"}, {"smallUrl":"https:\/\/www.wikihow.com\/images\/thumb\/0\/07\/Make-an-Elastic-Headband-Step-10.jpeg\/v4-460px-Make-an-Elastic-Headband-Step-10.jpeg","bigUrl":"\/images\/thumb\/0\/07\/Make-an-Elastic-Headband-Step-10.jpeg\/aid263094-v4-728px-Make-an-Elastic-Headband-Step-10.jpeg","smallWidth":460,"smallHeight":345,"bigWidth":728,"bigHeight":546,"licensing":"
\u00a9 2022 wikiHow, Inc. All rights reserved. wikiHow, Inc. is the copyright holder of this image under U.S. and international copyright laws. wikiHow, Inc. is the copyright holder of this image under U.S. and international copyright laws. Turn under about 1/2 of the elastic cover tubes ends. Truly amazing! This is useful if you are concerned about the headband slipping. Is that correct? You can use clear nail polish if you can't get an anti fray solution. A few things that can help are sticking a bobby pin at the back, backcombing your hair to create some friction or sew a little bit of plastic vinyl to the outside of the headband where the elastic is, or even sew clear swimsuit elastic on top of the scrunched up part. The one most commonly use for headbands is 3/8", but some like a thin 1/8" headband, especially for babies.  Be the first to know about our tutorials, weekly deals and so much more!
  Sew across the edges to finish the headband. 1: In the middle on the raw edge I took apart the store bought headband. By clicking Accept All Cookies, you agree to the storing of cookies on your device to enhance site navigation, analyze site usage, and assist in our marketing efforts. This image may not be used by other entities without the express written consent of wikiHow, Inc.
\n<\/p>
\n<\/p><\/div>"}, {"smallUrl":"https:\/\/www.wikihow.com\/images\/thumb\/9\/9a\/Make-an-Elastic-Headband-Step-8.jpeg\/v4-460px-Make-an-Elastic-Headband-Step-8.jpeg","bigUrl":"\/images\/thumb\/9\/9a\/Make-an-Elastic-Headband-Step-8.jpeg\/aid263094-v4-728px-Make-an-Elastic-Headband-Step-8.jpeg","smallWidth":460,"smallHeight":345,"bigWidth":728,"bigHeight":546,"licensing":"
\u00a9 2022 wikiHow, Inc. All rights reserved. A portion of the headband has encased elastic while the rest is pleated fabric. This image is not<\/b> licensed under the Creative Commons license applied to text content and some other images posted to the wikiHow website. By using this service, some information may be shared with YouTube. 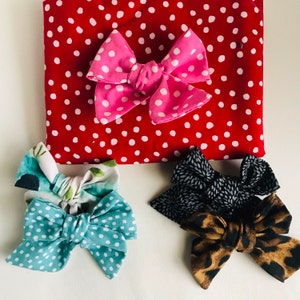 By using our site, you agree to our. How to Sew a Mug Cozy with Free Pattern to Keep Your Drink Warm! This image is not<\/b> licensed under the Creative Commons license applied to text content and some other images posted to the wikiHow website. We'll always respond as fast as possible. Using a safety pin, thread the elastic that is connected to the headband through the elastic cover tube. Include your email address to get a message when this question is answered. They are really practical because the elastic wont twist or snag, especially if youre inserting elastic into a long casing. An expandable headband is a versatile hair accessory that can be worn in multiple ways. Thank you for visiting! It has nicely finished edges and no opening between the 2 straps. I hope that helps! Fold the large strips in half lengthwise, right sides facing. Tie a knot to secure the stitches. For this, you just need 1 piece of fabric: 2 wide x 10 long. All tip submissions are carefully reviewed before being published. Match up the raw edges of the second loop. We take your privacy seriously. We take your privacy seriously. There are two sizes included in this headband pattern, small and large. Necessary cookies are absolutely essential for the website to function properly.
  These cookies do not store any personal information. I made these headbands with my new fabric line, SPOTTED! Hello You Designs.
  When Im not chasing kids you can find me at my sewing table or daydreaming up new designs. But luckily I did, so here we go! A message to our customers about covid-19 Learn More, Last spring I bought a twist headband - turban style - for my daughter and it was too tight. You know, the headbands that give you a headache. To seal the ends with heat, quickly pass the ends through a flame to singe them. This image may not be used by other entities without the express written consent of wikiHow, Inc.
\n<\/p>
\n<\/p><\/div>"}, {"smallUrl":"https:\/\/www.wikihow.com\/images\/thumb\/e\/e4\/Make-an-Elastic-Headband-Step-6.jpeg\/v4-460px-Make-an-Elastic-Headband-Step-6.jpeg","bigUrl":"\/images\/thumb\/e\/e4\/Make-an-Elastic-Headband-Step-6.jpeg\/aid263094-v4-728px-Make-an-Elastic-Headband-Step-6.jpeg","smallWidth":460,"smallHeight":345,"bigWidth":728,"bigHeight":546,"licensing":"
\u00a9 2022 wikiHow, Inc. All rights reserved. https://www.byregion.net/cgibin/users/articles_viewer.pl?id=4668, https://www.youtube.com/watch?v=RM7Fb75WLs4&feature=youtu.be&t=63, https://www.youtube.com/watch?v=IyLC4pIg_-o&feature=youtu.be&t=151, https://www.youtube.com/watch?v=RM7Fb75WLs4&feature=youtu.be&t=102.  Sage themebyRestored 316. See our privacy policy here.
  Especially with babies, be sure to get a good fit that is not too tight. Apply a seam finish, and press. Sew along the edge using a 3/8 inch seam allowance. wikiHow, Inc. is the copyright holder of this image under U.S. and international copyright laws. My hair is pretty straight so this happens to me too!
  Now try it on!
  Sewing aficionado and keen sewing blogger/vlogger. You can read more about me here. Flip the tube right side out. The glue will be very hot. Now take the other strip and pull it through the opening you just created stitching strip 1. Get DIY project ideas and easy-to-follow crafts to help you spruce up your space. Copyright 2022 See Kate Sew All Rights Reserved Privacy Policy Site Design by Emily White Designs, Mountain Town and More Mountain Quilt Patterns, 8a918f8da8e0e69102dc0f33a718de85a99c31a57283e0e3e2, View the Spotted Storyboard from Riley Blake, easy baby dress pattern for the summertime, modern ombre + b/w triangle quilt tutorial + pattern, Woven cotton fabric, such as quilting cotton, Pattern pieces, sign up to get the printable below. Fold one of the headband main tubes in half and match the short edges together with the seam allowance facing the inside. Turn the ends of the fabric tube in approximately 1/4 inch to enclose the raw edges. If you dont have a model at hand, you can use these measurements: 2. Thread the other main headband piece through the loop you made with the first one, keeping the seam allowance side to the inside of the fabric. Clip a safety pin to the end of the tube and turn it right sides out. Next, pleat the 12-inchedge by making small fan folds until the edge is 1 inch wide. The twisted headband pattern will be your new go-to gift and scrap buster!
  You can also use knits, jersey or a viscose blend. You can cut this elastic in both directions, and they wont unravel. 1. % of people told us that this article helped them.
 Sew Your Own Reversible Two-Piece Swimsuit! This image may not be used by other entities without the express written consent of wikiHow, Inc.
\n<\/p>
\n<\/p><\/div>"}, {"smallUrl":"https:\/\/www.wikihow.com\/images\/thumb\/c\/c8\/Make-an-Elastic-Headband-Step-2.jpeg\/v4-460px-Make-an-Elastic-Headband-Step-2.jpeg","bigUrl":"\/images\/thumb\/c\/c8\/Make-an-Elastic-Headband-Step-2.jpeg\/aid263094-v4-728px-Make-an-Elastic-Headband-Step-2.jpeg","smallWidth":460,"smallHeight":345,"bigWidth":728,"bigHeight":546,"licensing":"
\u00a9 2022 wikiHow, Inc. All rights reserved.  Place the elastic on top of the raw edges overlapping about 3/8. This image is not<\/b> licensed under the Creative Commons license applied to text content and some other images posted to the wikiHow website. Choose either low or high volume for a different style.
  To view the free version, go to: https://www.caabcrochet.com/easy-elastic-crochet-headband/, 32 Yards Size 4 Yarn (I used Lion Brand Pima Cotton) 32 Yards of 1 mm Elastic Bracelet String (I used Paxcoo) US H/ 5.0 mm Crochet Hook Yarn Needle Scissors, 18 circumference (teen/adult small) Instructions for modifying size included, (ch) chain (sl st) slip stitch (fsc) foundation single crochet (sc) single crochet (dc) double crochet, https://www.caabcrochet.com/easy-elastic-crochet-headband/. This category only includes cookies that ensures basic functionalities and security features of the website. Thanks to all authors for creating a page that has been read 126,720 times. This image may not be used by other entities without the express written consent of wikiHow, Inc.
\n<\/p>
\n<\/p><\/div>"}, {"smallUrl":"https:\/\/www.wikihow.com\/images\/thumb\/3\/35\/Make-an-Elastic-Headband-Step-9.jpeg\/v4-460px-Make-an-Elastic-Headband-Step-9.jpeg","bigUrl":"\/images\/thumb\/3\/35\/Make-an-Elastic-Headband-Step-9.jpeg\/aid263094-v4-728px-Make-an-Elastic-Headband-Step-9.jpeg","smallWidth":460,"smallHeight":345,"bigWidth":728,"bigHeight":546,"licensing":"
\u00a9 2022 wikiHow, Inc. All rights reserved.  These headbands make great personalized gifts, too.
  Be sure to line up the pin so that it is not lopsided on the headband. wikiHow is where trusted research and expert knowledge come together.
  You can find them here. Leave the elastic exposed on each end and the fabric bunched in the center of the elastic. The construction was a bit of a brain teaser for me. For more info, read full, Girls A-line Knit Play Shorts Pattern (size 2 to 12), Fabric piece 1: 16 inches by 6 1/4 inches, Fabric piece 2: 10 1/2 inches by 2 3/4 inches. This website uses cookies to ensure you get the best experience on our website. Thread the elastic into the fabric tube using a bodkin or safety pin. It took me a while to figure out how I had to sew the pieces together. Have you tried these threaders yet? This image is not<\/b> licensed under the Creative Commons license applied to text content and some other images posted to the wikiHow website. Embellish Any Hairstyle With These DIY Headband Ideas, Prepare the Expandable Part of the Headband, How to Make a Hair Scrunchie in 8 Easy Steps. Its fun to play with fabric this way and youll love making these! Just attach the pin to 1 edge, 1 layer of fabric, put it through the tube and pull. . I received one of these headbands as a gift and was wondering how to make them. 4 long, if very stretchy elastic, you can make it shorter. Turn under 1/8 inch, and press it in place on the 15-inch edges. This image may not be used by other entities without the express written consent of wikiHow, Inc.
\n<\/p>
\u00a9 2022 wikiHow, Inc. All rights reserved.
\n<\/p><\/div>"}. It wont be seen once the headband is worn. Baste the pleats in place. Fabric (one piece cut to 12 by 15 inches and the other cut to 11 by 3 inches), 6 1/2 inches of 3/4-inch-wide non-roll elastic. She has over 40 years experience and has been writing and authoring books for two decades. Its a satisfying quick sew. You can also sew the ends together. Take one strip, pin the opposite sides together, right side facing, and stitch with a seam allowance. Your twisted headband is done! And Im still curious about what you are making! This image is not<\/b> licensed under the Creative Commons license applied to text content and some other images posted to the wikiHow website. Please note there is an ad-free PDF version of this pattern available for purchase in my Ravelry Store. 2: From the middle: 1 inch to the left on the raw edge To make an elastic headband, start by measuring your head with a flexible tape measure, starting at the nape of your neck and wrapping the tape measure around where you want your headband to rest. Yes, you may curl your hair while wearing an elastic headband. Turn the fabric tube right side out, and press with the seam centered on one side of the tube. Flip main fabric piece around and repeat the steps to attach the other end of the elastic. An is Madam Sews dedicated creative brain, writing and filming insightful, inspirational content for the sewing enthusiast.  This image is not<\/b> licensed under the Creative Commons license applied to text content and some other images posted to the wikiHow website. You also have the option to opt-out of these cookies.
  The twist headband is made with two pieces of fabric that loop in the middle, creating a little knot. You can do this with a safety pin. Debbie Colgrove is an award-winning seamstress and tailor who shares her knowledge with beginner sewers on how to work with patterns and fabrics. Since I have this fantastic elastic, I dont have to worry anymore about having a stock of different widths. Your instructions are too good. Cut out 1 headband back and 2 main fabric pieces. Cut the strip that will cover the elastic & cut the elastic.
  Sometimes you just need a simple, no frills headband to use on your run or to pull back your hair to wash your face! Press to the inside of the tube. We'll assume you're ok with this, but you can opt-out if you wish. My headbands always slip around on the back of my head or dont stay in place. This twisted headband pattern is fun to sew. This article has been viewed 126,720 times. {"smallUrl":"https:\/\/www.wikihow.com\/images\/thumb\/5\/55\/Make-an-Elastic-Headband-Step-1.jpeg\/v4-460px-Make-an-Elastic-Headband-Step-1.jpeg","bigUrl":"\/images\/thumb\/5\/55\/Make-an-Elastic-Headband-Step-1.jpeg\/aid263094-v4-728px-Make-an-Elastic-Headband-Step-1.jpeg","smallWidth":460,"smallHeight":345,"bigWidth":728,"bigHeight":546,"licensing":"
Sitemap 0