endstream
endobj
284 0 obj
<>stream
3. WARNING: This product contains one or more chemicals known to the State of California to cause birth defects or other reproductive harm. Do not force the wire shutoff arm up or down.

Depending on the model, raise the front of the refrigerator so it rolls more easily OR raise the leveling screws so they dont scrape the floor. Only valid for new orders on whirlpool.com. If you have an automatic ice maker, turn off the ice maker.
topload Be sure to check out our latest offers to start saving! It is recommended that you do not install the refrigerator near a heat source, such as an oven or radiator.
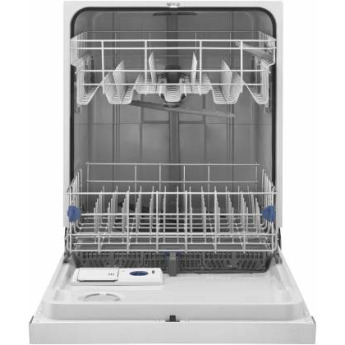
dishwasher argos When storing meat longer than the times given, freeze the meat. Airflow ControlThe Airflow control regulates the amount of air flowing between the freezer and the refrigerator compartments. Move food packages away from door.

Gaskets dirty or sticky? Door blocked open?
Tighten any connections (including connections at the valve) or nuts that leak. cu Oops! Measure the distance from the bottom of the refrigerator door to the floor. Depending on your model, your refrigerator has either Style 1Contour Doors or Style 2Standard Doors. Please include a daytime phone number in your correspondence. cu Oops! Before purchasing, make sure a saddle-type valve complies with your local plumbing codes. In the U.S. and Canada, direct all requests for warranty service to: Commercial, non-residential, multiple-family use, or use inconsistent with published user, operator or installation instructions. Readjust if necessary. Help resolve or help diagnose common appliance issues with links to helpful content and product information, We'll help you order the right parts and accessories for your Whirlpool appliance, Schedule a service appointment for your Whirlpool appliance, Find the right Whirlpool appliance replacement in a few easy steps, Please select the product you want to troubleshoot, Click below for information regarding connected appliance troubleshooting, This guide provides an overview of product features and related technologies. Excludes ground shipped products. Remove the three dome caps and screws from the handle side and use them to fill the holes created when the hinge screws were removed.

Wipe up spills immediately.IMPORTANT: To Clean Your Refrigerator:NOTE: Do not use abrasive or harsh cleaners such as window sprays, scouring cleansers, flammable fluids, muriatic acid, cleaning waxes, concentrated detergents, bleaches or cleansers containing petroleum products on exterior surfaces (doors and cabinet), plastic parts, interior and door liners or gaskets. Place in plastic bag or plastic container and store in crisper. Slide the deli cover to one side until free. WHAT IS COVEREDFor one year from the date of purchase, when this major appliance is installed, operated and maintained according to instructions attached to or furnished with the product, Whirlpool Corporation or Whirlpool Canada LP (hereafter Whirlpool) will pay for Factory Specified Replacement Parts and repair labor to correct defects in materials or workmanship that existed when this major appliance was purchased, or at its sole discretion replace the product. Sign in to unlock deals on major appliancesSee DetailsShop Sales. Place the refrigerator door onto the Bottom Hinge pin.4. NOTE: Your refrigerator dealer has a kit available with a (6.35 mm) saddle-type shutoff valve, a union, and copper tubing. Food or medicine loss due to product failure. Do not wiggle or walk the refrigerator when trying to move it, as floor damage could occur. When moving the refrigerator for cleaning or service, be sure to cover the floor with cardboard or hardboard to avoid floor damage. See Warranty for phone numbers. If you need further assistance or more recommendations that may help you avoid a service call, refer to the warranty page in this manual and scan the code with your mobile device, or visit www.whirlpool.com/product_help. hR8A%0(\B8>[I|8kNp+iw?WB(D(DS?~DB*G%A%AcH4vlZd{Fim&|ch48)Z#8)`47>~,#xGF]ma;,
7Fg(|Qx2y^6ml"0).!
water whirlpool filter system sink under filtration purifier kenmore theclearanceman Set aside refrigerator door until bottom hinge is installed on the opposite side of the refrigerator.
whirlpool 1ix argos 
Reverse Doors and Hinges (optional)IMPORTANT: If you want to reverse your doors so that they open in the opposite direction, follow these steps. Remove the bin by lifting it and pulling it straight out. Allows humid air to enter refrigerator. Replace the glass by pushing it straight in. Adjust the control to any setting between LOW and HIGH.LOW (open) lets moist air out of the crisper for best storage of fruits and vegetables with skins. The ice maker is equipped with a built-in water strainer. This limited warranty is effective from the date of original consumer purchase. Replace the bin by sliding it in above the desired support and pushing it down until it stops. Close the door slowly and firmly to keep the door from popping open. Check to see whether the sediment filter in the reverse osmosis system is blocked. Allow 24 hours for ice maker to make new ice. Property damage can occur if the water supply is not turned off. This is normal. j
p?5&s54v6ml1ftau{%8X/yr-nUj-N)yaOe#fnp4zul;5M.-"OTQ} -kW5uL$,"69iZ[-+GPBN/% Adjusting the Temperature ControlIf you need to adjust the temperature in either the refrigerator or freezer compartment, use the settings listed in the chart below as a guide. Pick-up or delivery.
whirlpool dishwasher greentoe monochromatic sensor cycle zoom built Fasten the shutoff valve to the cold water pipe with the pipe clamp. This stops odor and mold from building up. All rights reserved. 2. Slide the crisper drawer straight out to the stop. Item added to the compare list, you can find it at the end of this page. Adjust the control(s) a setting colder. Keep all parts together. Use the order number you received during checkout. Clean Before UsingAfter you remove all of the package materials, clean the inside of your refrigerator before using it. NOTE: Your ice maker has an automatic shutoff. Tape rubber or wood blocks to the tops of both doors to prop them open far enough for air to get in. Replace the fuse or reset the circuit breaker. Large load of food added? We use your information in accordance with ourprivacy policy. Remove the door stop from the bottom of the refrigerator door. Tighten all screws. Use (6.35 mm) O.D.

This online merchant is located in the United States at 600 West Main Street, Benton Harbor, MI 49022. Deli DrawerTo reposition the deli drawer: Deli Drawer CoverTo remove and replace the deli drawer cover: NOTE: The deli drawer slides sideways on the shelf to allow for flexible positioning. If the problem continues, call an electrician.

This is normal. Total: (Before Taxes, Shipping, and Services): Link your shopping cart across all your devices!
Turn the leveler to lower or raise that side of the refrigerator. Your safety and the safety of others are very important.We have provided many important safety messages in this manual and on your appliance. endstream
endobj
289 0 obj
<>stream
MSRP is the Manufacturer's Suggested Retail Price, which may differ from actual selling prices in your area. WHIRLPOOL SHALL NOT BE LIABLE FOR INCIDENTAL OR CONSEQUENTIAL DAMAGES. Rub a small amount of liquid dish soap over any adhesive residue with your fingers. The deli drawer design allows flexible positioning. See Water Supply Requirements.. If your refrigerator seems unsteady or you want the doors to close easier, adjust the refrigerators tilt using the following instructions: 1. to your account to save and access your shopping cart on your desktop, tablet, or mobile device. Control(s) set correctly for the surrounding conditions? In Canada, call 1-800-807-6777.If outside the 50 United States or Canada, contact your authorized Whirlpool dealer to determine whether another warranty applies. Home Whirlpool Whirlpool Refrigerator User Instructions Manual. PROOF OF PURCHASE IS REQUIRED TO OBTAIN WARRANTY SERVICE.Please have the following information available when you call theCustomer eXperience Center: Whirlpool Customer eXperience Center In the U.S.A., call 1-800-253-1301. Insert the hinge pin into the Bottom Hinge of the refrigerator door and fasten the hinge to the cabinet. Always pull the refrigerator straight out when moving it.
whirlpool 8kg argos Place the free end of the tubing in a container or sink, and turn ON the main water supply. This site only ships to the United States.

Slip the compression sleeve and compression nut on the copper tubing as shown. When you plug in the refrigerator for the first time, turn the Airflow control to the Recommended setting. 6. If your model came with a Reversibility kit, please use the Brand Badge Placement template and the following instructions to install the Brand Badge on the opposite side of the freezer door. Some states and provinces do not allow the exclusion or limitation of incidental or consequential damages, so these limitations and exclusions may not apply to you. IMPORTANT: Once the performance is achieved, return the Airflow control to the Recommended setting to keep the refrigerator operating at optimum efficiency. Proof of original purchase date is required to obtain service under this limited warranty. Are you a medical professional? Subscribe to Receive To turn cooling back on, press and hold the Setting button again for 4 seconds.
advice help whirlpool dishwasher LIMITATION OF REMEDIES; EXCLUSION OF INCIDENTAL AND CONSEQUENTIAL DAMAGESYOUR SOLE AND EXCLUSIVE REMEDY UNDER THIS LIMITED WARRANTY SHALL BE PRODUCT REPAIR AS PROVIDED HEREIN. Major appliances limited to washers, dryers, refrigerators, ranges, cooktops, wall ovens, microwaves, dishwashers, hoods, freezers, beverage & wine centers, ice makers and compactors. Replace the shelf by sliding the back of the shelf into the track in the wall of the cabinet. We seem to have lost our map and can't update your zip code right now. Cosmetic damage including scratches, dents, chips, and other damage to the appliance finishes unless such damage results from defects in materials and workmanship and is reported to Whirlpool within 30 days. Please locate the appliance's model and serial number before calling. If your refrigerator hasan ice maker, allow extra space at the back for the water line connections. While supplies last. Youre currently browsing the US version of Whirlpool's site. Allow for 1 (2.54 cm) of space behind the refrigerator. If you want the door to open from the other direction, you must reverse the door swing. If your refrigerator has an automatic ice maker, and is connected to the household water supply, turn off the water supply to the refrigerator. Please try again in a bit. Ends August 10, 2022 at 11:59PM EST. Discard ice. Wait 24 hours after ice maker installation for ice production to begin. See Using the Control(s).. Clean refrigerator, wipe it, and dry well. endstream
endobj
287 0 obj
<>stream
When you get to your new home, put everything back and refer to the Installation Instructions section for preparation instructions. 9. For stainless steel models, stainless steel is corrosionresistant and not corrosion-proof. Before you begin, turn the refrigerator control OFF, unplug refrigerator or disconnect power. Do not store anything on top of or in the ice maker or ice storage bin. Coil the copper tubing. Water running/dripping may be heard when ice melts during defrosting and water runs into the drain pan. Repairs to parts or systems to correct product damage or defects caused by unauthorized service, alteration or modification of the appliance. 9. Refrigerants must be evacuated by a licensed, EPA certified refrigerant technician in accordance with established procedures. Ends August 10, 2022 at 11:59PM EST. The unit may run even longer if the room is warm, a large food load is added, the door is opened often, or if the door has been left open. Wait 24 hours between adjustments for the temperature to stabilize.
whirlpool dw argos ins wht fs dishwasher stainless standing steel support ss ao Required fields are marked *. Refrigerator not tilted toward the rear? Glass shelves and covers are heavy. Excludes ground shipped products. hlQ]O0+Bv>H+JIKN>tZ:Qv?8{3;3+{X'"8C$SH4Y84~>-nn0^$p{
C&oU=R&1k1\n~)J?ijW#mo5 *jK:,#6t[Ul/3q2'j]f], K@;r]*`3mrc?ud*XGi_GfN;>Wwo!=oWDre{2/yc\]-a1=7A^ | {>+qTC;+Y1aB_S |e
Kink in the water source line?

Place the plastic spacer beneath the hinge so that it will be between the hinge and the cabinet, making sure the holes are aligned. If you want a longer or more comprehensive warranty than the limited warranty that comes with this major appliance, you should ask Whirlpool or your retailer about buying an extended warranty. The ice maker should produce approximately 8 to 12 batches of ice in a 24-hour period. Slide the shelf back into the refrigerator, and then replace the deli drawer. (outside diameter) copper tubing.
whirlpool tum sensor argos Rinse and dry with soft cloth. Water shutoff valve not fully open? The freezer door must close tightly. Using the screw removed earlier, fasten the door stop to the bottom of the freezer door. Repeat these steps for the other end. Slide the ice storage bin under the ice maker, and push it toward the back as far as it will go.
whirlpool fscr wht 12kg argos 10kg Ice cube jammed in the ice maker ejector arm? Tighten the packing nut. All safety messages will tell you what the potential hazard is, tell you how to reduce the chance of injury, and tell you what can happen if the instructions are not followed. Attach the copper tubing to the valve inlet using a compression nut and sleeve as shown. Be sure to check out our latest offers to start saving!

Cover the remaining hole with the cap (provided). Remove all food from the refrigerator and pack all frozen food in dry ice. MSRP is the Manufacturer's Suggested Retail Price, which may differ from actual selling prices in your area. Lift front of deli drawer with one hand while supporting bottom of drawer with other hand. Place washer on the upper hinge pin of the Center Hinge. Here are a few easy ways to reach us.
 whirlpool washing wh bi machine support awo mach argos
If you have questions about your water pressure, call a licensed, qualified plumber. Be sure to slide the shelf in all the way. Ice maker turned on?


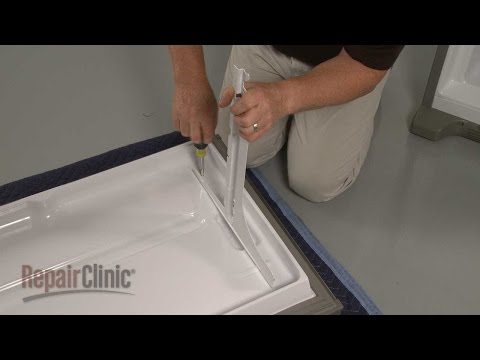
Remove the screws from the top of the refrigerator door handle. Screw compression nut onto outlet end with adjustable wrench. Gather the required tools and parts before starting installation. Allow several hours for refrigerator to return to normal temperature. The utility compartment may be removed for easier cleaning.To remove and replace the utility compartment: Ice MakerIMPORTANT: For models with a water filter, after connecting the refrigerator to a water source or replacing the water filter, fill and discard three full containers of ice to prepare the water filter for use. Some questions can be addressed without service. Keep flammable materials and vapors, such as gasoline, away from refrigerator. Pull the handle away from the door to release it from the shoulder screw. Push the cover back to release the rear clips from the shelf. Depending on your model, place the handle on the shoulder screw and push the handle toward the door until the mounting base is flush against the door. It is recommended that a separate circuit serving only your refrigerator be provided. Replace Doors and HingesIMPORTANT: Provide additional support for the doors while the hinges are being moved. Use the tube clamp on the back of the refrigerator to secure the tubing to the refrigerator as shown. Questions about your Manual?

Place the freezer door on the upper hinge pin of the Center Hinge. Do not overtighten. Remove the two flat-head handle screws from the bottom of the freezer door handle.
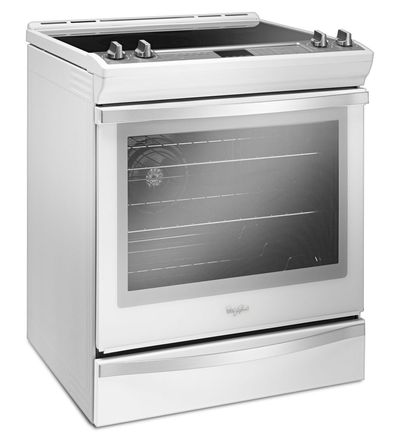
convection Your email address will not be published. &U$0ykv`=L#|pc8/p?+3iX0p)dfp
Remove the utility compartment by squeezing against one side while raising the utility compartment up and pulling it straight out.
freezer refrigerator
Sitemap 2