If its not cut all the way, press the GO button again and let it do a few more passes. Then apply glue to back of the one of the foam pieces with the cut outs for the blade housings, quick swap tips, and extra blades. Upload the FREE SVG file to Design Space and press SAVE. There are a few paid versions as well, so just make sure you keep looking till you find a free one. Your email address will not be published. Chances are you have stumbled across a play kitchen makeover on Pinterest or Instagram featuring the ever popular DUKTIG set from IKEA. This just makes it look nicer. I dont have a pretty little workspace like you see all over Pinterest. It should be quick to do, super affordable and fun to make this handy organizer! If the frame has a smooth surface I recommend scuffing it up a bit with some sandpaper for better paint adherence, Spray paint frame in desired color/colors. There was one section that was just barely hanging on. I also used a paper towel to wipe off any extra glue that seeped through. No need for the 24 passes my machine wanted make, it would have cut clear through my mat! Supplies: (Links below may be affiliate links), Small Acrylic Make Up Brush Organizer Box from Amazon (this is for a set of 2, you can make another one for your friend or use it to organize other stuff), My template, you can download the SVG file here for FREE (for personal use only, please do not sell or redistribute my file), Knife Blade (to cut the chipboard, you should be able to use this for the foam too if you dont have the deep cut blade). document.getElementById( "ak_js_1" ).setAttribute( "value", ( new Date() ).getTime() ); This site uses Akismet to reduce spam. See I told you it was easy to make this DIY Cricut Tool Organizer by doing a cheap hack on an old picture frame! If you choose to use the Dollar Tree or other smaller foam sheets like I did, then I recommend placing them on your cutting mat so that the first foam sheet ends just shy of the4 inchmark. Lay out your tools on the frame surface to figure out their heights. Change the color of your MATERIAL so you can actually see the cut lines. Side note: I tried using my regular green mat, its a little old, I dont think it was sticky enough, the foam kept getting pulled up and ripped by the blade, even with the masking tape around the edges. If you have any issues when making this yourself, please do nothesitateto ask, I would love to help if I can. For the 2nd group to cut, duplicate the group with the tool shape cut outs, then place the solid rectangle below. These lines will not show once everything is assembled, but I put this side down. ( Im guessing these people dont have cats or dust in their house.). Save my name, email, and website in this browser for the next time I comment.

Once your foam and chip board piece is flattened out, you can add your tools and blades! I will note, I CANNOT NICELY hang my Cricut XL Scraper on these hooks. To avoid Making your own growth chart ruler to track your children's growth over the years does not have to be a complicated or hard craft! This year one of my goals is to better organize all of my craft and art supplies. Hi Everyone! Make sure to line up your edges while the glue is still wet. Just wasnt in my budget at the time. pay attention to how you assemble your foam sheets, because if you flipped them like I did, then you will need to mirror your cardstock before you cut it. I found some smaller ones intended for make up brushes, but I decided to use one for my Cricut tools and blades. The rotary blade started to cut/dig into my mat. Some professional organizers tell you collections, 5 Easy Car Cleaning Hacks with @HARTtoolsUSA [AD], SAVE THIS if you dont already have a cleaning s, Stop putting so much pressure on yourself.
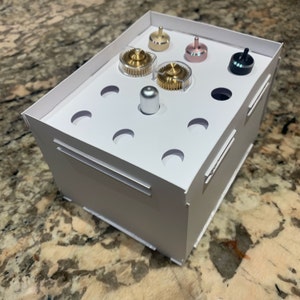
They MUST have a lid to help keep the dust out and they have to fit in one of the cubbies at them end of my work desk. Load the mat into the machine and press GO! 2mm Heavy Chipboard or other stiff material for backing, a paintbrush you dont care about ruining to apply glue.

Lets start from the bottom up. For a finishing touch, you can make a label out of adhesive vinyl. Attach the 2nd piece of foam to the mat, making sure your cut lines fall within the taped edges. Theyre very cute, but just not practical for me. I hope to bring you a helpful tutorial or a quick little tip each week. The side that was cut on will have small lines from the rotary blade. I had better success cutting the foam if I placed toward the middle of my mat. I added random small items on my desk on top of my foam layers to help hold them in place as they dried. When you cut out your foam sheets it is best to use your rotary blade, this should have come with theCricutMaker. Want to make your own custom design on a shirt? When the glue was still wet sometimes the layer below would move when I moved the top layer. I will be making a foam piece to fit inside this drawer so myCricuttools can be stored nicely in there and not move around when I open and close it. I also placed a pretty piece of cardstock over my foam sheets once they were assembled, just to make it look nicer. You may be wondering if this project is for youas it may look more complicated than it is! Select the Image and press INSERT IMAGES. If you are interested in purchasing more Cricut tools to fill out your new Cricut tool organizer, then click here to Cricut.com. This post contains affiliate links, which means I receive a small commission, at no extra cost to you, if you make a purchase using this link. Ive been buying a lot of clear acrylic storage bins on Amazon to help organize my stuff. While frame dries you can start to assemble the backdrop. Log in, Cricut scraper, tweezers, and weeding tools, packs of non-Cricut brand blades on Amazon, https://www.minordiy.com/cutting-cardboard-cricut-knife-blade/, Crafting Supplies Heart | Maggie Rose Design Co, DIY Sharpie Marker Holder for your desk Minor DIY. The Briar Patch 2019 All Rights Reserved WorldWide Girly Child Theme ~ Designed by Divi Lover.
jennifermaker chipboard Carefully remove the cut pieces from the mat. Required fields are marked *. The first layer is gray, then blue, green, red, orange, yellow, and the last most top layer is the white. The best part about it is just how Im Amy, the mom behind the scenes. This part took me some time because I was working with two pieces trying to make the patterns match up in the direction I wanted them. I decided to use my green mat. Select the top most group and click ATTACH. An old picture frame: color doesnt matter! We just moved a few months ago and now that I have an office on my main floor; my Cricut gets more attention than it did in the basement of my old house. You should then select flannel as your material setting. Attach it to the chip board with the other foam layers, align your edges. I hope Cricut will let us adjust the Knife Blade settings in the future. You can also click this link: https://design.cricut.com/landing/project-detail/5fbb9a0ecb46d210ccf4bcb6. After two or three layers I would wait for the glue to dry a bit before adding the next layer. You can read our full disclosure policy here. Select EVA foam from your materials (I tried Craft Foam, but my pieces kept tearing). You can get your Cricut Tools displayed in a cute organized way by utilizing materials you probably already have hanging around at home!

My first cut was on my green foam sheet, which I just laid both foam sheets long ways. Did you know the bottom piece of yourCricutMaker opens up and is a drawer? So, I thought it would be a good idea to use a less sticky mat. Once the machine is done cutting, check your cut to make sure it went all the way through, if its good, unload your mat. And just like that you are done! Stop co. Heres 7 ideas of where you can keep your Cricut pens and markers. In the machine itself: I know that the Cricut Maker does have a section designed to allow you to store your wedding tools and a couple of blades; upright in special little pockets built into the side of the machine. So You Got A Cricut Machine For ChristmasNow What. Your email address will not be published. The Briar Patch is a place for Moms; to help them navigate the tangled messes of Motherhood. You can also store the blades in the front flap of the machine, but I know myself, and I will forget to take out all the blades/ tools I need for a particular project before I start my machine. Now, I can utilize this great extra storage space, and my tools do not get knocked around. Go back to the CANVAS screen and and hide all the layers except for the solid rectangle with finger holds, were going to cut just this piece out of 2mm Chipboard or whatever other stiff material you have selected. It is really easy for you to take some materials you have at home and make your own version of this DIY Cricut Tool Holder Organizer Frame. Tagged: cricut beginner, cricut maker, cricut organizer, cricut pen, cricut storage, cricut tools.

Take my failures $$ and learn from them by just getting this size the first time! This design can be found for free in Design space. This foam can tear and get stretched easily, that is why I decided to use the less sticky mat. I did not, as I did not want the glare from the glass distracting from my pretty wallpaper behind it. Place your foam and chipboard piece under a heavy book overnight to flatten it out. I have A LOT! There are many organization ideas out there my idea being just one of them! For a generic pattern this part would go really quick! Place one of the foam sheets centered on the mat. Attach it to the chip board with the other foam layers, align your edges.
jennifermaker I am not a super pro Cricut crafter by any means, but I still wanted to find a way to keep my tools handy, up away from my toddlers reach, and displayed nicely in my new office!
Hopefully you will have most of these materials on hand so this handy tool holder is as affordable as possible! Glue down your paper or wallpaper onto the picture frame backing. Take your picture frame remove all the glass and picture mats from it. Get organized for completing this project before you get started with the Crafting and DIY Project Planner, Neutral, Foliage Themed Board and Batten Baby Nursery Feature Wall, 3D Growth Chart Ruler: DIY lifesize ruler at home to track precious memories, IKEA DUKTIG Play Kitchen Makeover Tutorial, Pegboards: people use framed pegboards to hang weeding tools, brayers, scrapers, and other cutting tools (such as rotary blades, rulers, precision knives, etc). Select the 2nd mat and move those pieces toward the middle of the mat also. So, pay close attention to the colors to figure out what order to place your pieces in. Hi, Im JoAnna, thanks for stopping by!
Sitemap 1