Now, it's time to turn these resin objects into wearable jewelry! Then settle the earring back into place over the resin. on Step 6. Especially for those of us who have glitter obsessions! Super fun and sparkly. It depends on the level of sparkly you prefer as well as the deepness of the color. Annnnd you can use this process anywhere you need a super strong adhesion. I love these and I will definitely have to make them sometime. Join us in Counter Culture DIY Artist Supportwhere we, and other artists, offer ideas, answer questions, and support each other!
nunn Finally, set it under the UV Lamp for a minute or two and your earrings are complete! Turn on your UV Lamp and set the earring mold under it for a few minutes while the resin cures. 5 years ago. I love how it looks like outer space, hence the name Cosmos Earrings.
We can help with both your work and personal life tasks, letting you focus on whats most important. Let harden overnight. Cure 2 minutes.
resin udemy brass skillshare Be sure to follow us on Pinterest so you can stay on top of everything thats new and never miss a blog post! Plus, silicon molds are fairly inexpensive.
resin jewelry 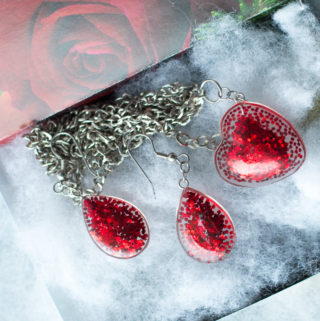
Here are some of my first pieces: Then I got creative! Add ear wires or posts. They shrank and wouldn't hold any resin - don't do this. Make sure to read all safety labels on your UV Resin Bottle.

You dont need your Cricut for this one, but you can definitely slap a decal on these cuties if you wish! Add your final layer of resin and place the earring post in that final layer. Heres the deal: Ive built up quite the sparkle library of embellishments and Ive slowly been making my way through downsizing. Answer As always, a big thanks to Meg for sharing her time and talent with us. If you want them thicker for more strength, add a layer of resin (domed) to the backs after removing the tape.ps I made these 2 years ago and they still look the same : ), Question


Copyright document.write(new Date().getFullYear()); All rights reserved @AKV Technologies, 651, N. Broad St, Suitr 206, Middletown , DE-19709,USA, Digital Marketing - Startups and Small business. Have extra molds nearby to limit waste. Since it doesnt need to be combined, it only comes in one bottle instead of two. Once the earrings are completely cured, remove them from the mold. This costs about $6, but it's a very small amount. Swap in different, As always, a big thanks to Meg for sharing her time and talent with us. There are also many types of resins, pigment, and glitters to use as well. So start with just one drop, mix it well, and then decide if you need to add a little more.
viralnova glitter A virtual assistant provides various services to entrepreneurs or businesses from a remote location. In fact, my original idea was to use rainbow colored resin in layers. Next, mix up a new batch of resin and coat the backs of your earrings so they look even and shiny. El x. Hi!
resin glitter jewelry thefrugalcrafter Hi, Im Kathy, The Crafty Chica! See Video how to download the SVG files. Subscribe to our newsletter.Plus, get access to the latest and greatest content from Brit + Co. We've all seen gorgeous resin jewelry at shops, boutiques, and on fashionistas everywhere. Sharing to Pinterest, Facebook or Twitter, helps me tremendously by having others visit my post. Lets work together! Pour a layer of resin, then place your items in the mold and pour another layer over the fillers if you need to.

Thanks! After it is cured it will be easy to peel off the spillage. If you dont mix it well enough, it will not cure. Try to keep the wire as flat as possible. Throw away any shards you cut off, and to clean your silicone mat, you can use nail polish remover. All you need to do is put a little dab of the UV Resin where you want to attach your earring back. Scrabble tile magnets are great because you can spell out all sorts of words and phrases with them. Here's what I've come up with Popsicle sticks for mixing and a container to mix in.
resin earrings glitter jewelry Squeeze the bottle allowing the resin to flow through the reservoirs of the earring mold until the resin reaches the top. If you want more inspiration and information we have a Facebook group for that. If you want a glittery background, pour glitter on top once you've filled your molds. Check out my services page HERE. I dont want to pitch it, so Ive been using it in ways that are embedded, contained, and functional. I hope you have fun. Dry tempera is a childrens craft item, you mix the powder with water to make washable paint for kids. Customer and Admin Support, Sales, Web Designing, SEO & SMO Marketing. 2022 Kathy Cano-Murillo The Crafty Chica.
craftklatchwithmona Press, press, press. Since you can move the lamp around and hold it wherever you need to, you can use this resin to bond just about anything. Send it to us atsupport@counterculturediy.com, and we can feature them here! Alcohol Ink Coffee Cup To Add a Splash Of Color To Your Mornings, Glitter (I purchased my glitter at Michaels). Heres a list of Supplies for this project: UV Resin does have a chemical odor and should be used in a well ventilated space. But UV Resin gives us another fabulous option for making small items like jewelry, badge reals, key chains, and magnets! Lets Paint Something Easy & Fun!

It did still leave a residue, but that comes off with solvent. If you are new to UV Resin and want to learn more about it, we have a post for that too! Twist the wires where they cross tightly a few times. When you are curing in a clear mold, make sure you flip the mold over to the other side to allow to cure fully on both sides.

Use your torch or heat gun to remove air bubbles.

Join us in. UV Resin can be used to attach your jewelry hardware, magnet backs, and so much more. You can also use a high temp heat gun, such as an embossing gun. Although I've been experimenting with resin, these free form backless bezel earrings are new territory for me.
Finish off your earrings. In this video see how to use the rings with Join the Beadaholique newsletter list for new product announcements, exclusive coupon codes, sale alerts and more. Although you need some specific tools and supplies you wont regret the investment!

Make sure you flip your project over so it an cure on the other side as well! 3 years ago, Thanks! ". Carefully sand the sides if the edges feel rough or uneven with fine grit sand paper.
Gina C. Creates Designs. New One-G and Amiet Beading Thread from Toho, New TierraCast Spring Round-Up Collection, Free Class: Mixed Media Jewelry - Spotlight on Resin, Free Class: Unique Ways to Use Chain in Jewelry Making, Free Class: Get Organized - Jewelry Care & Storage, Free Class: Learn the Basics of Wire Wrapping, Free Class: Right Angle Weave 101 - Designer Favorites, Free Class: Designing Strung Jewelry - Beyond the Basics, How to Make Scrabble Tile Magnets using Magnetic Tape, How to Make 5 Pairs of Bridesmaids' Earrings for Under $20, How to Use Nunn Design Prong Setting Rings. Question: Can one step resin be used with UV light box or does it have to be the 2 part cured with time? Which means we can create many beautiful pieces in the fraction of the time that it takes traditional resins to cure. In this project, you'll use it to place the glitter. Use the stirrer to mix the two and then mix until your resin looks fully clear with no streaks. Use a toothpick or tiny spatula to make sure all surfaces of the bottom of the mold are covered.

Oz. Gel Du Soleil UV Epoxy Dimensional Gloss for Crafts & Jewelry 0.3 Fl. All Rights Reserved! Nunn Design Bright Silver Plated Pewter Collage Circle Bezel 1/2 Inch, Earring Findings, Bali Style Earring Hooks with Ball 21mm, Silver Plated (25 Pairs).

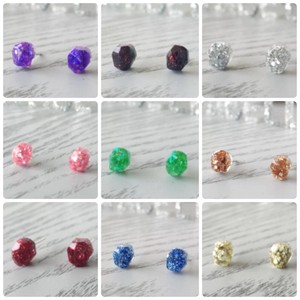
For this project, I would highly recommend using silicon molds. Brooke, Answer Note: Easy Cast yellows, so only use it in projects that yellowing won't matter. Please use protective gloves and face mask. We handle your everyday critical task such as Appointment scheduling. If you are new to UV Resin and want to learn more about it, we have a post for that too! The glitter appears to float inside the wire frame in an almost holographic way. Sprinkle glitter in rows in rainbow order: You can go as light or as heavy as you want with the glitter. Create website on various platform ,SEO,SMO, Digital Marketing and many More. Now pour the glitter resin into two pairs of earrings and half of the oval in the third pair. Finally, use the UV Resin to attach your earring hardware and your earrings are ready to wear! Cure for 2 minutes.

The sets are great as they have all the colors you'll need.

So you may need to either: Put down a thin layer of resin before the glitter, cure it, then top the glitter with more resin OR remove the earrings from the wax paper, turn them over and cure the other side.

Join our community and become a Forever Free Member! I was wrong.

STUFF. Website by Porchlight MCG+ Proudly powered by WordPress. I'm having a hard time finding glitter like you used. Mix just enough resin that you need. GAME CHANGER! I call them Sparkle Collage Hoops! You can leave the excess or shake it off. We've got repurposed jewelry, flowers and twigs found outside, sprinkles (yes, sprinkles! I had quite a bit of excess to trim (with a scissor), but they looked fine afterwards. I used one capful from each. Glitter Cosmos Earrings and Displaycards! Let the glue dry. It worked! For rings and pins, simply glue on with a quick hold contact adhesive and you're done.

Im an artist, author, and speaker and this is where I share my craft tutorials, artwork, articles, books, product lines, and workshops! How durable are they?
glamorous needed resincraftsblog galentine Highly trained Professionally managed Proficient in Microsoft, Google and most popular productivity suites.

I would love to see what you create! More stuff at: rhondachasedesign.com, Wet Formed Leather Harmonica Case With 3d Printed Logo. Misty Spinney is a hair stylist, makeup artist, and fashion stylist with a strong background in design and deep passion for creativity. You just need a few simple tools. To download free SVG files from Gina C. Creates, you must create an account. Scrape the sides of the cup to make sure you get every little bit! Craft room space is almost always at a premium. Social media is a very important weapon in your marketing plan. resin fillers: studs, jewelry, dried flowers, feathers. Feel better, get smarter, and LOL a little every week. UV Resin requires no lengthy stirring and cures in a matter of minutes under a UV Lamp. where we, and other artists, offer ideas, answer questions, and support each other! One of our favorite things about UV Resin is how quickly you can make beautiful art come to life. You can find more awesome video tutorials like this one on our YouTube channel! Virtual Assistant is a person who provides support services.
nunndesign Or sacrifice a cheap plastic measuring cup, and pour the resin mix into a condiment bottle for easy pouring. Move it around for good coverage. 4 years ago. Use the stirrer to mix them in with the resin layer.

Be sure to cover with a shoebox or something so no dust gets into the molds. Drill holes after they are cured. This method will take longer (15-20 min), but it will still cure. You can follow me here: tiktok.com/@craftychica let me tell you, resin crafts have made a comeback in a whole new way. For larger quantities, I use Easy Cast from a craft store (use a coupon!) No. Best of all it doesnt add any moisture to the resin so it cures well! You could also work in mica powders or foil flakes. so you can stay on top of everything thats new and never miss a blog post! For the measuring cup. Remove earring from mold. Just bought my first bottle of Resin , this looks like a good project to make for my daughter , very well done thank you.

From digital marketing tasks, scheduling appointments and managing events to personal errands. Next, get your fillers ready. If download button shows a blank page or a bunch of letters and numbers; Please open link directly in an internet browser and try again. I get my resin in various places for different uses. 3 years ago Getting super excited about UV Resin and want to see another project you can use it for?
instructables 
Meet your VA before deciding to work together so you get the perfect match of skills and style.. Realign your budget. Cut 2 pieces of wire about 6" each. Not just old school bartop varnish or deep-dish pendants, but super creative techniques and projects like layered pyramids, geode coasters, custom silicone molds and so much more. If you end up with a little bit of excess that presses out around the earring back, just just a tooth pick or other similar item to remove it. They cause leaks. Flip the mold over and cure for another 2 minutes. Check out our, How to Attach the Hardware to your Earrings. I wanted to see if I could color resin with dry tempera and yay! Then pop out the pieces. Small scissors are great for trimming the excess resin around the edges. Meg Epps of, But UV Resin gives us another fabulous option for making small items like jewelry, badge reals, key chains, and magnets! ), plastic spiders for Halloween, and, of course, glitter! The thinner the excess, the better for trimming it away later.
Flip over and cure the other side for another 2 minutes. In this video learn how to add glitter to UV resin and make a pair of sparkly earrings. Try different glitter and color combinations.
resin Once your resin looks the way you like it, you are all set to pour! Each technique will give you a different end result, and it will all depend what kind of look you are trying to achieve.
Water will not affect them. Note: I also used the glue to make some shapes that I thought would be useful as bezels. Set up your bezels on a sheet of wax paper. Use the stirrer to carefully add a thin layer of resin to the mold. Sometimes I just get clear 2-part epoxy at the hardware store if I'm doing small projects. This will be your resin test patch to make sure it's cured. You can find all of the fabulous supplies I used and more at Papermart. UV resin cures in just 15 minutes in a UV light (or sunshine) and is ideal for projects like this.

MAKE. Cut down what you need to so that you can quickly put everything together once you pour the resin.
earrings resin glitter stud jewelry resin glitter earrings rainbow instructables jewelry Then look for gaps. Especially when working with small amounts of resin like you use when working with the UV variety. Press the tape on as firmly as possible. My specialty is creative motivation. I made about two dozen pairs and Im selling them in my Phoenix store, and Ill upload them to my online shop too. Once you try out these kits, you will be more comfortable to try out different jewelry kits and the possibilities will be endless! But if your impatient like me, it make leak out over the top. Youll see air bubbles, thats okay. Thanks for such a fabulous amd beautiful idea! Using a stick, scoop out resin and slowly fill the bezels. Here is a video where I show how to mix the resin. Head over to my Q&A for help! Of course, you can use as little or as much of the additives as you want. Could you tell me where to find it please? In the video below, Meg shows us how she makes her fabulous resin earrings.
Then add a drop or two of Dispersion Color to the second cup and stir to combine. I'm going to try these today. And while we know this is something you can do at home, we weren't totally down with what seemed like a really complicated process. Join the family and become a Full Access Member! YES! I will also show you how to make the fun mesh window display cards in the video.

Stick your wire shape to the tape to make a backing. It is really simple to add your colorants and glitters to the UV Resin. Just remember that a little bit of Dispersion Color goes a very long way. Its where many of your potential customers are going to notice and engage with you. and some silver dry tempera. Dont get us wrong, we adore Artist Resins and Casting Resin! Heres the deal: Ive built up quite the sparkle library of embellishments and Ive slowly been making my way through downsizing. In the video below, Meg shows us how to make UV Resin earrings using some beautiful. If you've always wondered if you could make resin jewelry in the comfort of your home, the answer is yes. Or if you use wax paper, throw it away. Create a free website or blog at WordPress.com. GORGEOUS!!! Um, hullo I want to join the newfangled sparkle party! Enjoy your rainbows! If you're just making one or two pieces, you can use an old cough syrup measuring up to mix one part resin with one part hardener. Next, add your glitter to the medicine cup with more resin in it and stir to combine. Virtual Assistants For Entrepreneurs, Professionals, and Small teams. Place a small amount of resin covering the bottom third of the earring mold reservoir. I'm trying scotch tape instead of packing tape for this project because it was hard to unstick the shapes from the packing tape. (Look at my zipper earring tutorial for more on wrapped loops.). Do you have an art project using any of our products that you want to share? Your posting was very complete, not "leaving out" little tricks that can frustrate a person trying to complete the project. And there are so many different ways that you can add color and sparkle to your earrings! Remove earring from mold. Affiliate disclosure: As an Amazon Associate, we may earn a commission from product links and displayed ads from qualifying purchases through Amazon.com. I might as well call this an inspired by pintrest project because that is where I got the idea, I had seen lots of glitter resin jewelry being pinned and I really wanted to try it.
Sitemap 31